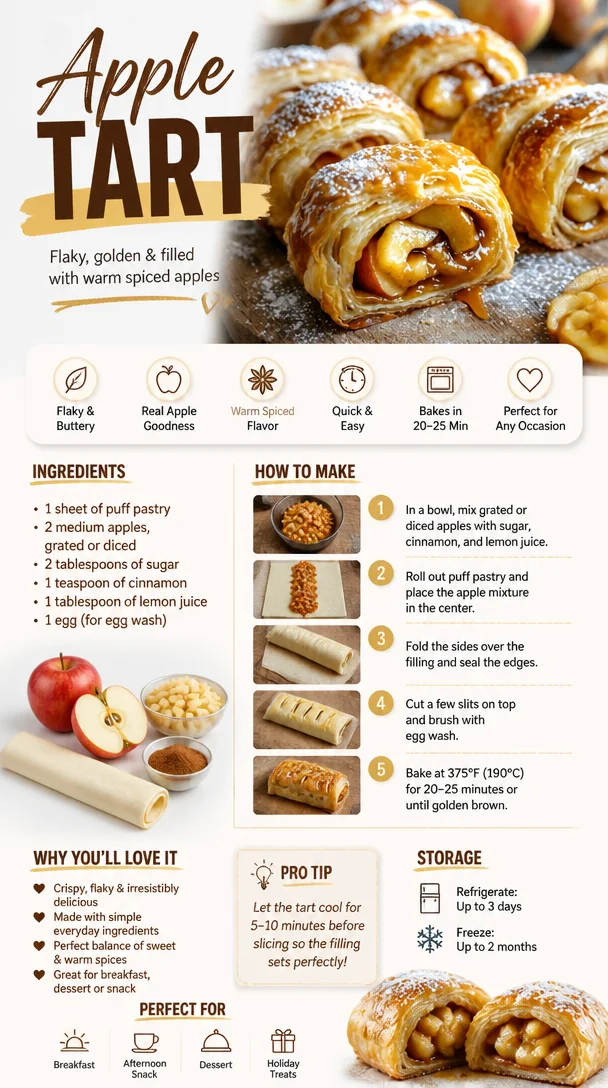
Delightful Apple Tart: A Cozy Culinary Adventure
Hello, friends! I’m Nina, and today we’re going to embark on a delightful journey through the world of Apple Tart. 🍏✨ This classic dish embodies everything I love about cooking — it’s simple, comforting, and deeply nostalgic. Whether it’s for a cozy family dinner or a sweet treat to share with friends, this tart is always a showstopper. So, grab your apron and let’s dive into what makes this apple tart so special!
A Slice of Nostalgia
Let me take you back to a warm autumn afternoon in my grandmother’s kitchen. The air was infused with the sweet aroma of cinnamon and baked apples, so enticing that it felt like a warm hug. My grandmother, with her flour-dusted apron and twinkling eyes, used to whip up her famous apple tart every fall. As she peeled the apples, she would tell stories about her childhood — tales of her family’s orchard where they would pick the juiciest apples under the sun.
One day, I decided to help her, thinking I could conquer this family recipe. But let’s just say, the peeler and I had a bit of a struggle session. By the time we were done, there was apple flesh everywhere! My grandmother laughed, showing me how to roll out the puff pastry, which I thought looked like a canvas for our delicious creation. We piled those pretty apple slices high and waited with anticipation as the tart baked away, filling the house with a delightful scent.
When that golden tart finally came out of the oven, I think we both knew this would be a family staple for generations to come. I still remember that first bite: the crunch of the pastry, the warmth of the cinnamon, and the sweet-tartness of those apples. It was pure heaven! So, today, I’m thrilled to share my own spin on Grandma’s recipe, ensuring you can create your own happy memories around this delightful Apple Tart.
Ingredients
Here’s what you’ll need to whip up your very own Apple Tart:
-
1 sheet of puff pastry
This is your tart’s base! Puff pastry bakes up beautifully flaky and golden. If you don’t have puff pastry, you can use shortcrust pastry or even a premade pie crust in a pinch. -
2 medium apples, grated or diced
Choose your favorite kind! I recommend a mix of sweet and tart apples like Fuji and Granny Smith for depth of flavor. If you prefer, you can use pears or even a mix of both! -
2 tablespoons of sugar
This adds sweetness and helps caramelize the apples. Feel free to swap with brown sugar for a deeper flavor, or even a sprinkle of maple syrup for that warm, fall vibe. -
1 teaspoon of cinnamon
Cinnamon is the star here! Its warm notes perfectly complement the apples. If you want to get adventurous, substitute some pumpkin spice or nutmeg for a twist! -
1 tablespoon of lemon juice
This brightens up the flavors and helps prevent the apples from browning. Fresh or bottled — whatever you have on hand! -
1 egg (for egg wash)
This gives your tart that beautiful, glossy finish! If you’re vegan, a bit of almond milk or a mixture of flour and water can do the trick.
Step-by-Step Instructions
Let’s get baking! Here’s how to make your Apple Tart step-by-step:
Step 1: Preheat and Prepare
Preheat your oven to 400°F (200°C). While that’s heating up, roll out your puff pastry on a lightly floured surface. Don’t worry about perfection; rustic is the name of the game here!
Step 2: Fit the Pastry
Once rolled out, carefully transfer the pastry to a tart pan (or a baking sheet if you’re going for free-form). Gently press it into the edges, and if you like, fold the edges inwards for a beautiful border.
Chef tip: Use a fork to poke holes in the bottom of the pastry. This prevents it from puffing up too much while baking!
Step 3: Prepare the Filling
In a mixing bowl, combine your grated or diced apples, sugar, cinnamon, and lemon juice. Give it a good stir until the apples are well-coated.
Little chef hack: If you want extra flavor, toss in a splash of vanilla extract or a handful of raisins!
Step 4: Assemble the Tart
Now, mound your apple mixture onto the prepared pastry, spreading it out evenly. You can arrange the apples in an artistic spiral if you’re feeling fancy. Either way, it’ll taste amazing!
Step 5: Egg Wash Time
In a small bowl, whisk the egg and brush it onto the edges of the pastry. This step is crucial for that beautiful golden color!
Step 6: Bake
Pop your tart into the preheated oven and let it bake for about 25-30 minutes, or until the pastry is golden brown and the apples are tender. During baking, you might want to keep an eye on it — every oven is a little different!
Fun story: I once accidentally left a tart in the oven too long… let’s just say it turned into an apple charred dish. But hey, we all have those moments!
Step 7: Cool and Serve
Once it’s out of the oven, let it cool for a few minutes before slicing — trust me, it’s worth the wait! As it cools, those flavors will meld together even more beautifully.
Serving Suggestions
Serving an Apple Tart is all about making it feel special! Here are a few ideas:
- Slice into wedges and serve warm with a scoop of vanilla ice cream or a dollop of freshly whipped cream on top.
- Arrange on a rustic wooden board with a sprinkle of powdered sugar for a charming presentation.
- Drizzle with a bit of caramel sauce or a sprinkle of crushed nuts for an added crunch.
- Pair with a hot cup of spiced cider or your favorite tea for a cozy afternoon treat.
Recipe Variations
Who says you can’t play with your food? Here are some creative twists to elevate your Apple Tart:
- Nutty Delight: Add chopped walnuts or pecans to the apple filling for a crunchy texture.
- Berry Fusion: Combine apples with fresh berries like blueberries or cranberries for a vibrant twist.
- Spiced Up: Experiment with adding a pinch of cardamom or ginger for an extra layer of flavor.
- Fruit Explosion: Mix in some thinly sliced pears alongside the apples.
- Maple Magic: Replace the sugar with maple syrup and add a tablespoon of maple extract for a warm, fall touch.
Chef’s Notes
Every recipe tells a story, and this Apple Tart is no exception. Over the years, I’ve played with different ingredients and techniques, but the essence remains the same: comforting flavors that bring people together.
Whenever I’m feeling nostalgic, I whip this up and invite my friends over. It’s incredible how food has a way of sparking memories and creating new ones at the same time. A gentle reminder: cooking is not about perfection; it’s about love, laughter, and sharing. So, if your tart doesn’t come out looking like a Pinterest post, don’t fret! I promise, it’ll taste just as heavenly.
FAQs and Troubleshooting
Here are a few common questions and troubleshooting tips to help you along the way:
Q: Why did my puff pastry not rise?
A: Ensure your pastry is cold before baking, and avoid overworking it. Poking holes helps too!
Q: Can I make this tart ahead of time?
A: Absolutely! You can prep the tart and refrigerate it before baking. Just pop it in the oven when you’re ready to enjoy!
Q: What can I do if my apples are too tart?
A: You can always add a little more sugar to balance out the tartness or serve with sweet cream!
Q: Can I freeze this tart?
A: Yes! Wrap it tightly in plastic wrap, and it should freeze well for up to three months. Thaw in the refrigerator overnight before serving.
Nutritional Info (Optional)
For those watching their nutrition, here’s a rough estimate (per slice, assuming 8 slices from the tart):
- Calories: 200-250
- Protein: 3g
- Carbohydrates: 30g
- Fat: 10g
- Fiber: 1g
Remember, these are just estimates and can vary based on your ingredients and portion sizes!
And there you have it! Your very own Apple Tart — a dish that not only warms the belly but also the heart. I hope it inspires cozy gatherings, cherished memories, and lots of laughter around your table. Happy cooking, and don’t forget to share your results with me. Let’s keep the flavor rustic and the love abundant! 🍏❤️
PrintDelightful Apple Tart
A classic, comforting apple tart that is simple to make and perfect for any gathering. Experience the nostalgic flavors of cinnamon and baked apples with a flaky pastry crust.
- Prep Time: 15 minutes
- Cook Time: 30 minutes
- Total Time: 45 minutes
- Yield: 8 servings 1x
- Category: Dessert
- Method: Baking
- Cuisine: American
- Diet: Vegetarian
Ingredients
- 1 sheet of puff pastry
- 2 medium apples, grated or diced
- 2 tablespoons of sugar
- 1 teaspoon of cinnamon
- 1 tablespoon of lemon juice
- 1 egg (for egg wash)
Instructions
- Preheat your oven to 400°F (200°C). Roll out your puff pastry on a lightly floured surface.
- Fit the pastry into a tart pan, gently pressing it into the edges. Poke holes in the bottom with a fork.
- Combine grated or diced apples, sugar, cinnamon, and lemon juice in a bowl. Stir until well-coated.
- Mound the apple mixture onto the prepared pastry, spreading it evenly.
- Whisk the egg and brush it onto the edges of the pastry.
- Bake for 25-30 minutes or until golden brown and apples are tender.
- Cool for a few minutes before slicing and serving.
Notes
Serve warm with vanilla ice cream or whipped cream for a delightful treat. You can also add nuts or berries for variations.
Nutrition
- Serving Size: 1 slice
- Calories: 225
- Sugar: 10g
- Sodium: 150mg
- Fat: 10g
- Saturated Fat: 3g
- Unsaturated Fat: 5g
- Trans Fat: 0g
- Carbohydrates: 30g
- Fiber: 2g
- Protein: 3g
- Cholesterol: 30mg
Keywords: Apple Tart, Dessert, Baking, Fall Recipes, Nostalgic Recipes





Leave a Reply