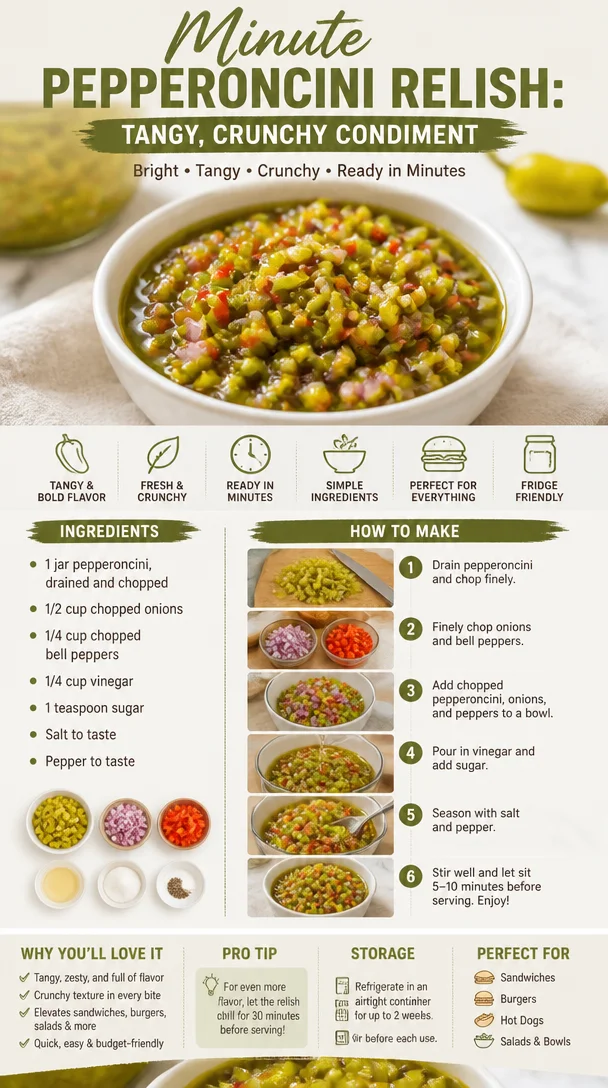
Unleashing the Flavor: Homemade Pepperoncini Relish Recipe
Hey there, food lover! If you’re anything like me, you know that the magic of cooking lies in the joy of bringing people together over flavorful, home-cooked meals. Today, I’m excited to share with you a delightful recipe that’s sure to add a zing to your dishes—pepperoncini relish! This tangy, crunchy topping is versatile, easy to make, and oh-so-satisfying. So, grab your apron and let’s get started!
A Taste of Nostalgia
One of my fondest memories in the kitchen revolves around making condiments with my grandmother on lazy Sunday afternoons. She had a magical way of turning ordinary ingredients into extraordinary delights. One day, we decided to whip up a batch of pepperoncini relish. I vividly remember the sound of the knife chopping through the pepperoncini and the sweet smell of onions sizzling in the pan.
As we mixed our ingredients together, my grandmother shared tales of her childhood in Sicily where fresh produce and homemade condiments were a staple. That day, that simple relish became more than just a condiment; it was a connection to our heritage and a celebration of flavor. Each bite transports me back to her warm kitchen filled with love and laughter.
Let’s recreate that special moment together!
Ingredients
Here’s what you’ll need to whip up your own jar of pepperoncini relish:
-
1 jar pepperoncini, drained and chopped
🌶️ These tangy, slightly spicy peppers are a fantastic base for the relish. If you prefer a milder taste, you can use banana peppers instead. -
1/2 cup chopped onions
🧅 Onions add a mellow sweetness and crunch. Red onions work beautifully here, but yellow or white onions are great substitutes too! -
1/4 cup chopped bell peppers
🌶️ Choose any color you like—red, green, yellow, or orange. They bring a fresh, crisp texture and vibrant color to the relish. Don’t have bell peppers? Try using diced jalapeños for a spicy kick! -
1/4 cup vinegar
🍶 A splash of vinegar adds the tangy punch that balances the sweetness of the sugar and onions. Apple cider vinegar or white wine vinegar are both great options. -
1 teaspoon sugar
🍬 Just a tiny hint of sweetness to round out the flavors. You can substitute honey or maple syrup if you’re looking for a more natural sweetener. -
Salt to taste
🧂 A pinch is always a good idea. Adjust according to your taste preference! -
Pepper to taste
🌱 Freshly cracked black pepper enhances the overall flavor profile. Feel free to add a pinch of red pepper flakes for some extra heat!
Step-by-Step Instructions
Ready to dive into this flavor-packed adventure? Let’s make some pepperoncini relish!
-
Prepare Your Ingredients
Gather all your ingredients and chop them finely. This step is crucial! The smaller the pieces, the better they blend together and create a harmonious relish.Chef Tip: Use a sharp knife—it’s safer and makes chopping a breeze!
-
Mix the Vegetables
In a large mixing bowl, combine your drained and chopped pepperoncini, onions, and bell peppers. The vibrant colors will make your kitchen feel like a party!Chef Hack: If you’re short on time, you can pulse the veggies in a food processor for a few seconds. Just be careful not to over-process!
-
Add the Vinegar and Sugar
Drizzle the vinegar over the chopped veggies and sprinkle in the sugar. Stir gently until everything is well mixed. Taste it at this point—so good already, right? -
Season it Up
Add salt and freshly cracked pepper to your relish. This is where you can adjust flavors. Prefer it saltier? Go for it! Like it tangier? Add more vinegar! -
Let it Rest
To really let those flavors develop, cover your bowl with plastic wrap and let it sit in the fridge for at least 30 minutes. This marinating step is crucial to create a flavorful relish.Chef’s Insight: If you can let it chill for a few hours or even overnight, you’ll be rewarded with a more robust flavor!
Serving Suggestions
Now that your pepperoncini relish is ready, let’s talk about serving it up! This relish is incredibly versatile:
-
As a Topping: Spoon it over grilled meats like chicken or pork for a burst of flavor. It’s fantastic on burgers or sandwiches too!
-
In Dips: Mix it with cream cheese for a quick and tasty dip for crackers or veggies. Trust me, your friends will be begging for the recipe!
-
With Snacks: Serve it alongside cheese and charcuterie boards. The tanginess cuts through the richness of meats and cheeses!
-
On Tacos: Add a spoonful to your tacos or burrito bowls for a delightful crunch and tang.
Recipe Variations
Feeling adventurous? Here are some ideas to switch things up:
-
Add Herbs: Try adding fresh herbs like cilantro or dill for extra flavor. Just remember to chop them finely!
-
Spicy Twist: Incorporate chopped jalapeños or a splash of hot sauce for those who love heat.
-
Garlic Lovers: Toss in a minced clove of garlic for an aromatic punch.
-
Fruity Flair: Toss in some diced tomatoes or chopped avocados for a fresh twist and additional texture.
-
Sweet & Spicy: Blend in diced mango or peach for a sweet and spicy combination that’s perfect for summer barbeques!
Chef’s Notes
This pepperoncini relish has certainly evolved over the years! I’ve tinkered with the ingredients, adding different herbs and tweaks to keep things fresh. The beauty of this recipe is its flexibility. Every time I make it, I’m reminded of my grandmother’s stories and our shared love for good food.
One funny kitchen story: I once forgot to drain the pepperoncini properly and ended up with a very soupy relish! I learned that day how essential it is to let those little things matter in the kitchen. So, heed my advice—don’t skip that draining step!
FAQs and Troubleshooting
Q: Can I use fresh pepperoncini instead of jarred?
A: Absolutely! Just roast them to bring out their natural sweetness, and chop them finely for the relish.
Q: How long will this relish keep in the fridge?
A: When properly stored in an airtight container, it should last up to two weeks—if it lasts that long!
Q: My relish turned out too salty. What can I do?
A: If you find it too salty, consider adding a bit more sugar and extra chopped veggies to balance the flavors.
Q: Can I freeze this relish?
A: Yes, you can! Just make sure it’s sealed well in a freezer-safe container. Thaw it in the fridge before serving.
Nutritional Info (Optional)
The nutrition breakdown for this pepperoncini relish can vary, but it typically comes down to about 10 calories per tablespoon. It’s low in calories and packed with flavor—you can indulge without guilt!
Wrap Up
I hope you’re feeling inspired to make this delightful pepperoncini relish! Remember, the joy of cooking is all about sharing those simple, honest moments—with yourself and those you love. Whether it’s brightening up a dish or inspiring a new kitchen adventure, relish is a fun way to add zest to your meals.
So, roll up those sleeves, get chopping, and create something warm, hearty, and unforgettable! Happy cooking! 🍲✨
PrintHomemade Pepperoncini Relish
A tangy and crunchy homemade pepperoncini relish that’s perfect as a topping, in dips, or alongside snacks.
- Prep Time: 15 minutes
- Cook Time: 0 minutes
- Total Time: 45 minutes
- Yield: 2 cups 1x
- Category: Condiment
- Method: Mixing
- Cuisine: Italian
- Diet: Vegan
Ingredients
- 1 jar pepperoncini, drained and chopped
- 1/2 cup chopped onions
- 1/4 cup chopped bell peppers
- 1/4 cup vinegar
- 1 teaspoon sugar
- Salt to taste
- Pepper to taste
Instructions
- Prepare Your Ingredients: Gather all your ingredients and chop them finely. This step is crucial!
- Mix the Vegetables: In a large mixing bowl, combine your drained and chopped pepperoncini, onions, and bell peppers.
- Add the Vinegar and Sugar: Drizzle the vinegar over the chopped veggies and sprinkle in the sugar. Stir gently.
- Season it Up: Add salt and freshly cracked pepper to your relish; adjust flavors to taste.
- Let it Rest: Cover your bowl and let it sit in the fridge for at least 30 minutes to develop flavors.
Notes
This relish can be served in various ways—over grilled meats, mixed with cream cheese for dips, or added to tacos for extra crunch.
Nutrition
- Serving Size: 1 tablespoon
- Calories: 10
- Sugar: 0g
- Sodium: 50mg
- Fat: 0g
- Saturated Fat: 0g
- Unsaturated Fat: 0g
- Trans Fat: 0g
- Carbohydrates: 2g
- Fiber: 0g
- Protein: 0g
- Cholesterol: 0mg
Keywords: pepperoncini relish, homemade condiment, easy recipes, tangy relish





Leave a Reply