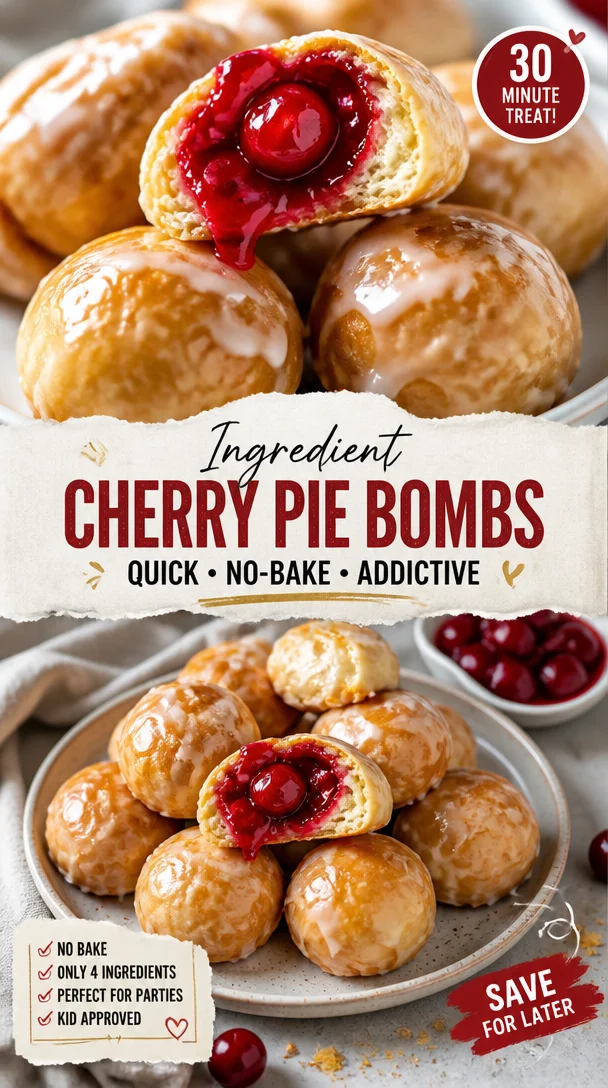
Cherry Pie Bombs: A Cozy Kitchen Adventure
Hey there, fellow food lovers! 🍒✨ Today, I’m so excited to share with you a delightful treat that merges nostalgia, simplicity, and a whole lot of warm fuzzies — Cherry Pie Bombs! This is a sweet twist on the classic cherry pie that’s perfect for any gathering or just a cozy night at home. Grab a cup of coffee, and let’s dive into a kitchen story that’ll surely warm your heart!
A Sweet Memory
Let me take you back to one of my favorite childhood memories. Picture this: it’s a sunny afternoon, and the air is filled with the sweet, tart fragrance of cherries being transformed into pie filling in my grandmother’s kitchen. She was a wizard with desserts, always bringing the family together with her magical baking skills. One moment I vividly recall is when she let me help her make cherry pie.
“Cooking is like a magical spell,” she said, as we chopped cherries and mixed in sugar. I was in awe, standing on a stool to reach the countertop, arms dusted with flour. It wasn’t just about eating the deliciousness; it was about the stories, laughter, and the love that filled every bite. That day, she taught me that food has the power to create memories, and here we are, years later, carrying on that tradition with a little twist of my own — Cherry Pie Bombs!
These cute, bite-sized treats are perfect for sharing, and trust me; they’re so simple to make, even your kids can join in the fun! So let’s roll up our sleeves and get cooking!
Ingredients
Here’s what you’ll need for these scrumptious Cherry Pie Bombs:
-
1 package refrigerated pie crusts
- Perfect for those busy days when you want a homemade touch without the fuss. If you’re feeling ambitious, you can always make your own crust, but ready-made is a lifesaver!
-
1 cup cherry pie filling
- The star of the show! You can use store-bought filling for convenience or make your own with fresh cherries. Need a substitute? Try blueberry or apple filling for a fruity twist!
-
1 egg (for egg wash)
- Gives those pie bombs a lovely golden color. If you’re looking for an egg-free option, brush with milk or a dairy-free alternative — it works wonders too!
-
Sugar (for sprinkling)
- Adds a delightful crunch and sweetness on top. For a fun twist, cinnamon sugar gives an extra layer of flavor!
-
Cooking spray
- A must for keeping those bombs from sticking to your baking sheet. Olive oil or melted butter can work in a pinch!
Step-by-Step Instructions
Ready to bring these cherry delights to life? Let’s get cooking!
Step 1: Preheat and Prep
Preheat your oven to 400°F (200°C), and while that heats up, take a baking sheet and spray it with cooking spray. Getting this done first helps everything cook evenly and prevents any sticking issues!
Step 2: Roll Out the Crust
Unroll the refrigerated pie crusts onto a lightly floured surface. Use a rolling pin to smooth them out gently if they seem a bit thick. Little Chef Tip: Cut the crusts into circles using a round cutter or the rim of a glass — aim for about 4 to 5 inches in diameter. Don’t worry if they aren’t perfect circles — rustic is what we’re going for!
Step 3: Fill ‘er Up!
Spoon about a tablespoon of cherry pie filling onto the center of each circle. Function meets fun — This is where you can let your inner artist shine! If you want more filling, go for it, but avoid overfilling, or they might burst during baking.
Step 4: Fold and Seal
Now, fold the edges of the pie crust up and over the filling to create a little pouch. Pinch to seal tightly! You want to keep all that delicious cherry goodness tucked inside. Chef’s Hack: A fork can help you crimp the edges for a pretty touch, plus it seals them well.
Step 5: Brush and Sprinkle
Whisk the egg in a small bowl, then brush the tops of your pie bombs with the egg wash. This gives them that gorgeous golden finish. After that, sprinkle a little sugar on top. If you’re feeling daring, sprinkle a bit of cinnamon on top too — it adds incredible flavor!
Step 6: Bake to Perfection
Place your filled cherry pie bombs onto the prepared baking sheet and bake in the preheated oven for about 15-20 minutes, or until they are golden brown and puffed up. Your kitchen will smell heavenly during this time—seriously, it’s like a warm hug!
Step 7: Let Cool & Serve
Once you’ve taken them out of the oven, let them cool for about 10 minutes. This makes them easier to handle and gives the filling a chance to settle. Now, serve them warm, and watch the smiles light up the room!
Serving Suggestions
Serve these Cherry Pie Bombs on a lovely platter with a scoop of vanilla ice cream on the side for a delicious contrast of hot and cold. You can also drizzle a bit of chocolate or caramel sauce over the bombs for a decadent touch. Add a sprig of mint for a pop of color — your guests will be wowed!
Recipe Variations
Here are a few fun twists you can try with these Cherry Pie Bombs:
-
Berry Mix – Swap out the cherry pie filling for a homemade berry mix. Strawberries, blueberries, and raspberries together create a burst of summer flavors.
-
Nutty Crunch – Add a handful of finely chopped nuts (like almonds or walnuts) to the filling for some added crunch and flavor.
-
Chocolate Surprise – Drizzle melted chocolate over the cooled pie bombs or mix chocolate chips directly into the pie filling for a delightful cherry-chocolate combo.
-
Spiced Apple Filling – Use apple pie filling instead of cherry. Add a pinch of nutmeg along with the apple filling for a cozy touch.
-
Savory Option – Change gears completely and fill with a savory mix of cooked meats and cheeses, turning these into perfect appetizers!
Chef’s Notes
Whenever I make these Cherry Pie Bombs, I’m instantly transported back to those sun-drenched afternoons in my grandma’s kitchen. I love how simple ingredients can come together to create something that feels so special — it’s a cozy cooking moment that never gets old.
Over the years, I’ve tweaked this recipe with different fillings and flavors, but the essence remains the same: it’s about creating a joyful experience. You can easily double the recipe if you’re hosting a crowd; they vanish fast!
FAQs and Troubleshooting
Q: What should I do if my pie bombs burst while baking?
A: Make sure not to overfill them! If they do burst, just serve them as rustic pie bites with ice cream on the side — no one will complain!
Q: Can I freeze these Cherry Pie Bombs?
A: Absolutely! Freeze them before baking and pop them straight from the freezer into the oven. Just add a couple of extra minutes to the baking time.
Q: How do I know when they’re done?
A: Look for that beautiful golden brown color on top. If the bottom is slightly firm to the touch, they’re good to go!
Q: What if I don’t have pie crusts?
A: You can use puff pastry or even biscuit dough if that’s what you have on hand. It’ll change the texture but will still taste fantastic.
Nutritional Info
(For one Cherry Pie Bomb)
- Calories: 150
- Carbohydrates: 18g
- Protein: 1.5g
- Fat: 8g
- Sugar: 2g
Final Thoughts
There you have it — Cherry Pie Bombs that encapsulate the nostalgia of home, warmth, and love in every bite. I hope these little treats inspire you to create your own kitchen memories — whether with family, friends, or even solo! Now it’s your turn to grab those ingredients and whip up something magical.
Can’t wait to hear about your adventures and variations. Happy cooking, and remember: every dish you create tells a story! 🍒❤️
PrintCherry Pie Bombs

Delightful bite-sized treats filled with cherry pie filling, perfect for gatherings or cozy nights at home.
- Prep Time: 15 minutes
- Cook Time: 20 minutes
- Total Time: 35 minutes
- Yield: 10 servings 1x
- Category: Dessert
- Method: Baking
- Cuisine: American
- Diet: Vegetarian
Ingredients
- 1 package refrigerated pie crusts
- 1 cup cherry pie filling
- 1 egg (for egg wash)
- Sugar (for sprinkling)
- Cooking spray
Instructions
- Preheat your oven to 400°F (200°C) and prepare a baking sheet with cooking spray.
- Unroll the refrigerated pie crusts onto a lightly floured surface and roll out if needed. Cut into circles about 4-5 inches in diameter.
- Spoon about a tablespoon of cherry pie filling onto the center of each circle.
- Fold the edges of the pie crust over the filling to create a pouch and pinch to seal tightly.
- Whisk the egg in a small bowl, brush the tops with egg wash and sprinkle with sugar.
- Place the filled cherry pie bombs on the baking sheet and bake for 15-20 minutes, or until golden brown.
- Let them cool for about 10 minutes before serving warm.
Notes
Serve with a scoop of vanilla ice cream or drizzle with chocolate or caramel sauce for added indulgence.
Nutrition
- Serving Size: 1 pie bomb
- Calories: 150
- Sugar: 2g
- Sodium: 200mg
- Fat: 8g
- Saturated Fat: 2g
- Unsaturated Fat: 6g
- Trans Fat: 0g
- Carbohydrates: 18g
- Fiber: 1g
- Protein: 1.5g
- Cholesterol: 35mg
Keywords: cherry pie, pie bombs, dessert, baking, easy recipes


Leave a Reply