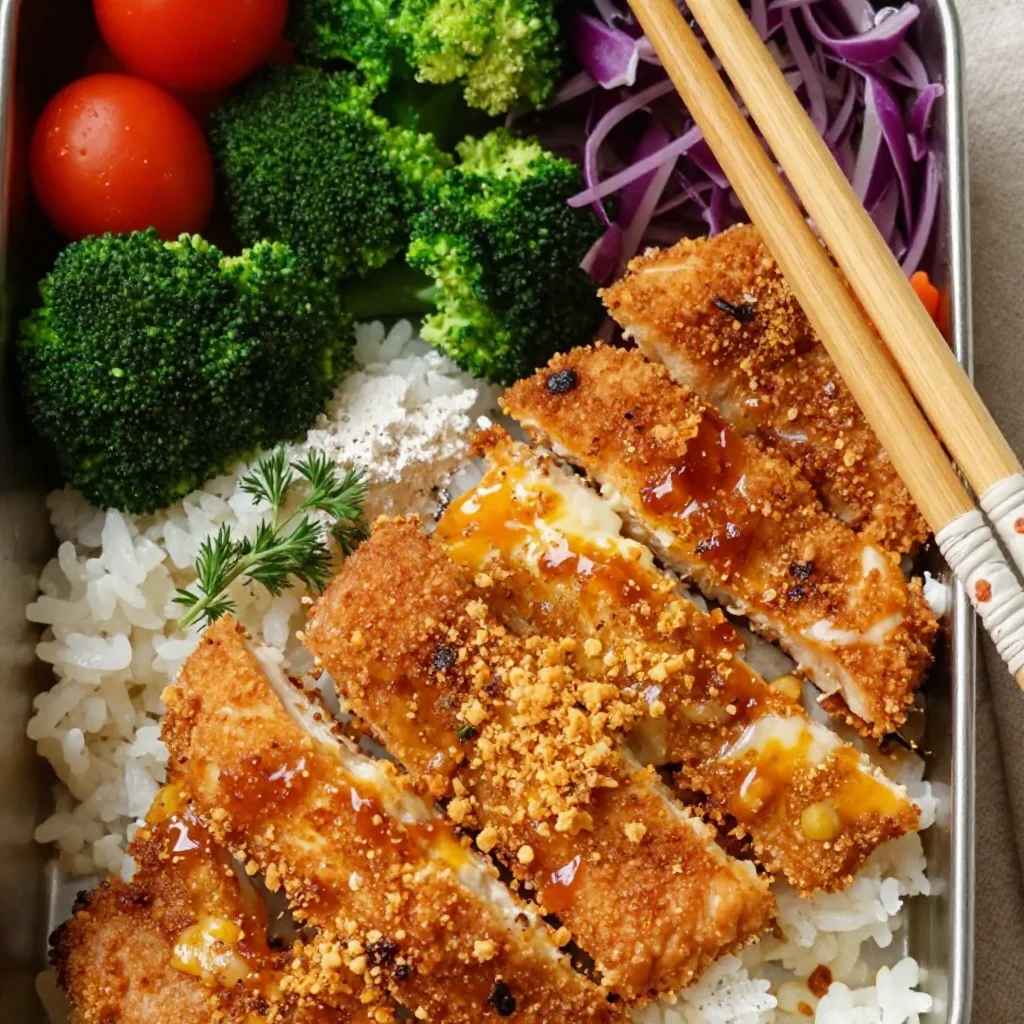
Chicken Katsu Bento Box: A Warm, Flavorful Meal to Share
Welcome back, fellow food lovers! Today, we’re diving into a dish that’s not only delicious but also incredibly nostalgic for me. It’s the Chicken Katsu Bento Box — a beautiful assembly of crispy chicken, sticky rice, and vibrant vegetables that’s sure to bring comfort to your day. So grab your apron and let’s get cooking!
Personal Story
Let me take you on a little journey back to my childhood kitchen. Growing up, Saturdays were my family’s designated cooking days. Mom would whip up a storm while I played sous-chef, making sure to taste everything. One day, she introduced me to Chicken Katsu. I remember the sizzling sound of the chicken frying, the aroma wafting through the house, and how excited I was to help.
We’d make a simple bento box for lunch, artfully arranging the crispy chicken alongside some rice and a medley of colorful veggies. It was not just a meal; it was a memory in the making. We took our time with each layer, chatting and laughing — and that’s when I realized that food is more than just sustenance; it’s a celebration of togetherness.
Ingredients
Let’s gather what we need to recreate this delightful experience. Here’s what you’ll require:
- 2 chicken breasts: Opt for boneless, skinless chicken thighs if you want more flavor and tenderness.
- 1 cup panko bread crumbs: These light and crispy bread crumbs give the katsu that satisfying crunch. If you’re gluten-free, look for gluten-free panko.
- 1 cup flour: All-purpose flour works great here, but whole wheat flour can add a nice nutty flavor.
- 2 eggs: These bind everything together. If you’re vegan, you can use flax eggs as a substitute.
- Salt and pepper to taste: Crucial for seasoning the chicken!
- Rice (for serving): Short-grain rice is traditional, but jasmine or basmati works just as well. Just follow the cooking instructions for the chosen rice to ensure perfect texture.
- Assorted vegetables (e.g., broccoli, carrots, bell peppers): Choose what you love! You can even roast or steam them for added flavor.
- Soy sauce (optional, for serving): A splash adds umami! If you’re avoiding soy, try coconut aminos as an alternative.
Step-by-Step Instructions
Alright, let’s get down to business! Follow these detailed steps for a perfect Chicken Katsu Bento Box.
Step 1: Prepare the Chicken
-
Butterfly the Chicken Breasts:
- Slice each chicken breast in half horizontally, creating thinner cutlets that cook faster and get crispy. This also makes it easier to fit into your bento box.
- Chef Tip: Place the chicken in a zip-lock bag and gently pound with a meat mallet or rolling pin until even. This helps with tenderness.
-
Season:
- Sprinkle salt and pepper on both sides of the chicken. You can add garlic powder or onion powder if you like an extra kick!
Step 2: Set Up Your Breading Station
- Bowls Galore:
- In one bowl, add the flour. In the second, whisk the eggs. And in the third, pour the panko bread crumbs.
- Chef Hack: Use one hand for wet ingredients (egg) and the other for dry (flour and panko) to keep things orderly and less messy!
Step 3: Dredge the Chicken
- Coat:
- Take each piece of chicken, dip it into the flour, making sure it’s well-coated.
- Next, dunk it into the egg, allowing any excess to drip off.
- Finally, coat it in panko, pressing lightly to ensure it sticks. Chef Insight: The more panko, the crunchier the katsu!
Step 4: Frying Time!
-
Heat the Oil:
- In a large skillet, pour in enough oil to cover the bottom (about 1/4 inch) and heat it over medium-high heat.
- Chef Tip: Test if the oil is ready by dropping in a few panko crumbs. If they sizzle, you’re good to go!
-
Fry the Chicken:
- Place the breaded chicken in the skillet, leaving space between each piece. Don’t overcrowd!
- Cook for about 4-5 minutes on each side until golden brown and crispy. You want that perfect crunch!
-
Drain:
- Once cooked, transfer the chicken to a paper towel-lined plate to drain excess oil. This keeps it crispy.
Step 5: Preparing the Rice
- Cook Your Rice:
- While the chicken is frying, prepare your rice according to the package instructions. You want it nice and fluffy. A rice cooker always helps if you’ve got one!
- Chef Insight: For extra flavor, cook the rice with a splash of soy sauce or broth.
Step 6: Sauté the Vegetables
- Quick and Colorful:
- In the same skillet, toss in your assorted veggies. Sauté them for about 5 minutes until tender but still vibrant. A little salt is all they need!
- Chef Tip: Drizzle with sesame oil for added depth.
Serving Suggestions
It’s time to create your bento masterpiece!
-
Start with the Rice:
- Scoop a generous portion of fluffy rice into a compartment in your bento box.
-
Place the Chicken:
- Slice the crispy Chicken Katsu into strips and lay it next to the rice.
-
Add the Vegetables:
- Fill in the remaining compartments with sautéed veggies. Feel free to get creative with your arrangement — food is art, after all!
-
Garnish and Serve:
- Drizzle a bit of soy sauce over the chicken for added flavor. Finish with a sprinkle of sesame seeds or sliced green onions for that culinary touch.
Recipe Variations
Let’s explore some creative twists!
-
Katsu Curry: Try adding a serving of Japanese curry sauce over the rice. It’s a comforting twist that pairs perfectly with Katsu!
-
Sweet and Spicy: Mix a bit of Sriracha into the soy sauce for those who like a kick.
-
Veggie-Packed: Slip in some pickled radishes or avocado slices for freshness and extra flavor. A few slices of cucumber can add great crunch!
-
Alternative Proteins: Swap the chicken for eggplant or tofu for a vegetarian version.
-
Noodle Twist: Serve your Katsu over a bed of sticky rice noodles instead of rice for a fun twist!
Chef’s Notes
Oh, the nostalgia! Every time I make this Chicken Katsu Bento Box, I’m whisked back to those Saturdays filled with laughter and learning in the kitchen. This recipe has evolved over the years; I’ve adapted it from my family’s traditional style to make it easier and a bit quicker for busy weeknights, while retaining its soul. Plus, I love experimenting with different sides based on seasonal veggies!
Remember, the kitchen is your playground. Don’t hesitate to switch things up and make this dish your own. Whether you turn it into a cozy dinner for two or a lunchbox surprise, Chicken Katsu is here to serve delightful memories.
FAQs and Troubleshooting
1. My Chicken Katsu is soggy. What did I do wrong?
Make sure your oil is hot enough before frying. If it’s not hot, the coating will absorb more oil and become soggy. Also, ensure the chicken has a good layer of panko.
2. Can I make this ahead of time?
Absolutely! You can bread the chicken and store it in the fridge for a few hours before frying. Just ensure you fry it fresh for the best crunch!
3. How can I reheat leftovers?
Reheat in the oven at 375°F (190°C) for about 10-15 minutes to restore the crispiness, or air fry it if you have one!
4. What can I use instead of eggs for breading?
You can use a mixture of flaxseed meal and water or even almond milk for a vegan option. Just make sure it’s thick enough to help the panko stick.
Nutritional Info
This recipe serves four and is a great source of protein, providing approximately:
- Calories: 500 per serving
- Protein: 30g
- Carbohydrates: 60g
- Fat: 15g (depending on the amount of oil used)
Creating this Chicken Katsu Bento Box is more than just following a recipe; it’s an invitation to share love through food. So bring your family and friends around, and let’s make memories that look good and taste even better! Happy cooking!
— Nina 🍲✨
PrintChicken Katsu Bento Box
A warm and flavorful Chicken Katsu Bento Box featuring crispy chicken, sticky rice, and vibrant vegetables.
- Prep Time: 20 minutes
- Cook Time: 25 minutes
- Total Time: 45 minutes
- Yield: 4 servings 1x
- Category: Main Course
- Method: Frying
- Cuisine: Japanese
- Diet: Omnivore
Ingredients
- 2 boneless, skinless chicken breasts
- 1 cup panko bread crumbs
- 1 cup all-purpose flour
- 2 eggs
- Salt and pepper to taste
- Rice (short-grain, jasmine, or basmati, for serving)
- Assorted vegetables (e.g., broccoli, carrots, bell peppers)
- Soy sauce (optional, for serving)
Instructions
- Prepare the chicken by slicing each breast in half horizontally, then season with salt and pepper.
- Set up your breading station with bowls of flour, whisked eggs, and panko breadcrumbs.
- Dredge each piece of chicken in flour, then in eggs, and finally coat in panko, pressing lightly.
- Heat oil in a skillet to about 1/4 inch depth over medium-high heat.
- Fry the breaded chicken for 4-5 minutes on each side until golden brown and crispy.
- Drain cooked chicken on a paper towel-lined plate.
- Cook your rice according to package instructions while the chicken fries.
- Sauté assorted vegetables in the same skillet for about 5 minutes until tender.
- Assemble the bento box by placing rice, sliced chicken, and vegetables in compartments.
- Garnish with soy sauce, sesame seeds, or green onions before serving.
Notes
For added flavor, drench rice in soy sauce or broth while cooking. Use toaster oven for reheating leftovers to maintain crispiness.
Nutrition
- Serving Size: 1 serving
- Calories: 500
- Sugar: 2g
- Sodium: 800mg
- Fat: 15g
- Saturated Fat: 3g
- Unsaturated Fat: 10g
- Trans Fat: 0g
- Carbohydrates: 60g
- Fiber: 4g
- Protein: 30g
- Cholesterol: 210mg
Keywords: Chicken Katsu, Bento Box, Japanese Cuisine, Comfort Food, Family Recipe




Leave a Reply